Here are a few sneak peeks at the selections we made. I will go room by room to show where I found the inspiration that brought us to our final decisions later. For now you can just guess where each combo may land.
Thursday, July 25, 2013
Sneak Peek at Selections
We finally finished all of our hard surface selections for the house. Hard surfaces include the carpet, tile, wood, cabinets and countertops. It took a lot of time, research and gentle guidance from Belinda, the designer at the Macadam Floor & Design center. At each appointment I arrived with my cut and paste inspirations notebook and camera. I like to take pictures of what we select, because by the end I get overwhelmed and forget what tile combos in which we decided.
Here are a few sneak peeks at the selections we made. I will go room by room to show where I found the inspiration that brought us to our final decisions later. For now you can just guess where each combo may land.
Here are a few sneak peeks at the selections we made. I will go room by room to show where I found the inspiration that brought us to our final decisions later. For now you can just guess where each combo may land.
Tuesday, July 23, 2013
Loads of Fun-ctional!
We have been finalizing the cabinetry plans for the house this past week. I became fixated on the laundry room. I felt like this room needed to be FUN-ctional! All my fellow mommies out their know how important it is to be functional. The nice thing about the laundry room is that I feel like you really don't have to put a lot of money into it to make it look nice and work great. In fact, I deleted several of the cabinets that the cabinet guy had originally designed. Less cabinets = less money! Here are some ideas I have found that I want to incorporate into the laundry room.
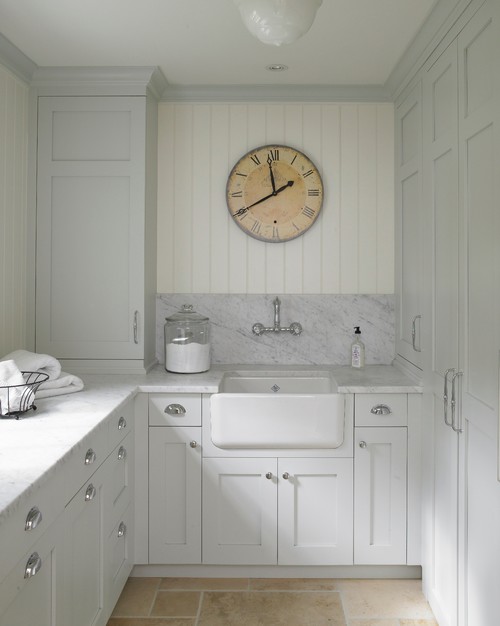
Traditional Laundry Room by Woodbridge Architects & Designers Huestis Tucker Architects, LLC
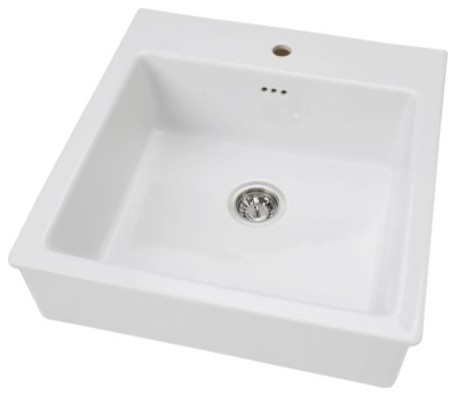
I LOVE the farm/front apron sink look in the laundry. But farm sinks can run you around $600 at the lower end. Well, you can get the same look at Ikea for $179! The sink isn't as deep and inserts on top of the countertop instead of being under mounted. But it is the laundry room for Pete's Sake! You still get the white front apron/single bowl/ deep sink look at a fraction of the price.
I LOVE the farm/front apron sink look in the laundry. But farm sinks can run you around $600 at the lower end. Well, you can get the same look at Ikea for $179! The sink isn't as deep and inserts on top of the countertop instead of being under mounted. But it is the laundry room for Pete's Sake! You still get the white front apron/single bowl/ deep sink look at a fraction of the price.
Bathroom Vanities And Sink Consoles by Other Metro Furniture and Accessories IKEA
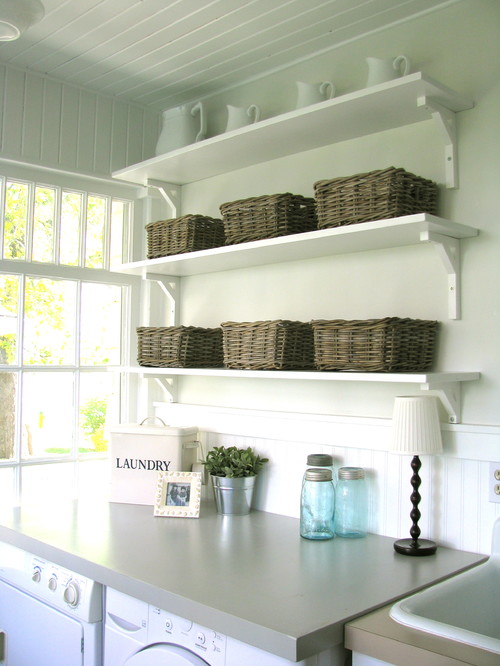
Next, I had seen this idea all over Pinterest. Making cubbies in the laundry room for laundry baskets. I HAD to have this! It makes so much sense to me. So, I deleted the original lower cabinet in the plan and drew in a box cubby system, if you will, for four laundry baskets. Here is a laundry room with that same idea.
Next, I had seen this idea all over Pinterest. Making cubbies in the laundry room for laundry baskets. I HAD to have this! It makes so much sense to me. So, I deleted the original lower cabinet in the plan and drew in a box cubby system, if you will, for four laundry baskets. Here is a laundry room with that same idea.
Laundry Room
Our laundry room isn't as wide so we will only have four cubbies instead of six. But our room will have a similar set up as to this one. A sink next to the washer and dryer and cubbies under the window. I want to hug whoever came up with this idea originally.
Above the washer and dryer I would like open shelving. I don't know about you, but I have to buy the Costco size laundry soap and it never fits into the cabinet. Cabinet deleted.
Traditional Porch by Toronto General Contractors HARDROCK CONSTRUCTION
Lastly, I have to admit, I do not invest a lot in my clothing. Most my wardrobe is from TJMax or Target. Therefore, the quality probably isn't the most durable, so I hang dry a lot of my clothes to get the longest life out of that $19 cotton dress I love so much! I saw this simple idea and added it to the plan. Have a rod put at the bottom of the upper cabinet above the sink. That way you can hang the clothes and they can drip dry right into the sink. Simple and smart.
Lastly, I have to admit, I do not invest a lot in my clothing. Most my wardrobe is from TJMax or Target. Therefore, the quality probably isn't the most durable, so I hang dry a lot of my clothes to get the longest life out of that $19 cotton dress I love so much! I saw this simple idea and added it to the plan. Have a rod put at the bottom of the upper cabinet above the sink. That way you can hang the clothes and they can drip dry right into the sink. Simple and smart.
Traditional Laundry Room by Forked River Closet & Home Storage Designers All About Closets
A couple of added little jewels for this room is a very inexpensive faucet from Ikea and the sconce lights I found months ago at the local Habitat for Humanity Store.
I am so excited to see all these ideas put together and use my FUN-ctional laundry room.
A couple of added little jewels for this room is a very inexpensive faucet from Ikea and the sconce lights I found months ago at the local Habitat for Humanity Store.
I am so excited to see all these ideas put together and use my FUN-ctional laundry room.
Friday, July 19, 2013
Fun Find Friday #5
The basement in this house will be Joe's domain. At first I wasn't sure how I would decorate this "man cave" thing. After a few clicks and scrolls through Pinterest and Houzz, I knew exactly what would fit Joe. As most men, Joe LOVES sports. If Sports Center is on in a 50 yard radius, we have lost him until the next commercial break. I want to give him the sports loving cave he deserves. I am thinking vintage Seattle Mariners and Seahawks accessories with an industrial/rustic sports bar feel.
When we were discussing the layout of the basement bar, we were trying to decide at what height to make it. Counter height or bar height. Though we already have the counter height stools to furnish this future bar, a man needs to "belly up" to a bar. (Not hip up) Coming from Florida, outdoor living is equal to basement living in Washington. It is cheap and easy added square footage. Every member of my family has built a bar in their back yard. In fact, I am pretty sure my dad built his bar before we even had beds in our house. From that experience I learned, a man needs a place to belly up!
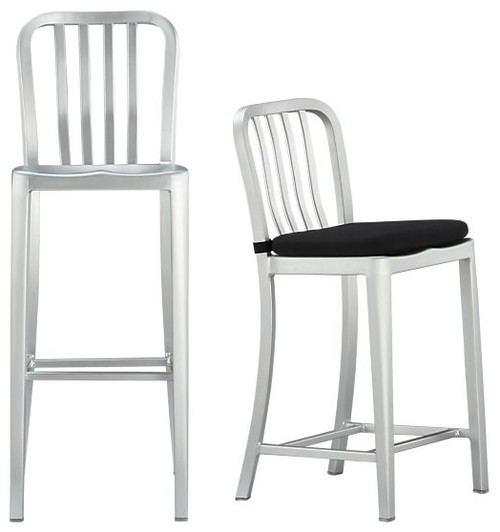
So Belly Up it is! Now I needed to find bar height stools. No problem here when it comes to finding chairs. More on my chair addiction later. I love looking for cool chairs.
Contemporary Bar Stools And Counter Stools
With a little patience and a lot of looking, I found exactly what I wanted on Craigslist. I found 3 Crate & Barrel bar height aluminum stools for the same price of one new chair! I am in love with them and think they will bring the vintage sports bar look to Joe's man cave.
With a little patience and a lot of looking, I found exactly what I wanted on Craigslist. I found 3 Crate & Barrel bar height aluminum stools for the same price of one new chair! I am in love with them and think they will bring the vintage sports bar look to Joe's man cave.
Monday, July 15, 2013
Raise The Roof!
July brings a busy calendar for our family. Lots of fun summer things going on like camps, road trips, weddings, BBQs, oh and building a house! Things are steadily moving a long as best as they can. The roof trusses are up and the place is really coming to life. All the planning on paper makes so much more sense to me now that I can see it in 3D. Here are picture of the progress we found the past couple of weekends. Along with the newest questions we are asking ourselves.
This will be a mini balcony at the front entrance. I saw this idea on Houzz and thought it would be an easy way to give the foyer a little more WOW! I hope it comes out like I envisioned :-)
This is the view from that mini balcony. The dilemma I am having now is, do I put a hanging light fixture? If so, where would I center it? The upper window, the window straight ahead or in-between?
The other question we had was about the window placement in one of the kids bedrooms. This room doesn't really have a good headboard wall. The only full wall would be the wall behind you as you walk in. I like to have a bed as a focal point when you walk in for both decorating and staging purposes. We think these windows are high enough off the ground to be able to fit a headboard under, but are they far enough apart?
This is the other wall you see when you walk into that room. We can't change this window because it is at the front of the house and would throw off the architecture.
Master Bedroom
Hallway leading to laundry, bedrooms and bathroom
Bonus room
I finally got to see the view on a beautiful clear summer day! You can see downtown and the Cascade Mountains!!!
We typically make a family visit to the construction site once a week. Joe obviously is there several times everyday, but for me it is once a week. If you have ever met my son Olen, a construction site really isn't a place you would feel comfortable having him roam around. There are far too many places for him to practice flying like Superman, if you know what I mean. So when we visit, he and Lila must stay out in the backyard. Joe and I take turns going through the house, while the other one stays in the back with the kids. The "yard" that is really just a field of dirt, rocks and wood scraps is the perfect place for the children of a home builder to be. They wanted me to take pictures of their latest creations.
"Fairy Rock Garden" by Lila
"Daddy's House" by Olen
The latest look of our nest!
Friday, June 28, 2013
Fun Find Friday #4 (on a Monday)
**I thought I had set this to post on Friday, for Fun Find Friday. But I guess I am still learning this blogging stuff. Anyway, I wanted to share this with you all ASAP in case anyone is looking for exterior lights. Screaming deals go fast.
A few weeks ago Joe and I spotted an amazing deal on exterior lights at Costco. They are regularly $39.99 (at a Costco price which is good), but on sale for $19.99!!! The limit is 4 per customer. I was just there this week and they have them in stock and are still on sale! So if you are in the market for exterior lights at an amazing price, here ya go!
A few weeks ago Joe and I spotted an amazing deal on exterior lights at Costco. They are regularly $39.99 (at a Costco price which is good), but on sale for $19.99!!! The limit is 4 per customer. I was just there this week and they have them in stock and are still on sale! So if you are in the market for exterior lights at an amazing price, here ya go!
Tuesday, June 25, 2013
Good News/Bad News
I will start this entry the way Joe likes to update me on the house......
"I've got good news and bad news. Which one do you want to hear first?"
The good news is, the housing market is on FIRE in the Seattle area. Inventory is low and demand is high. This is great news to hear after the last couple of years. A hot housing market means people have jobs again! WOO HOO!
Now the bad news. Because the market is booming, labor is hard to find. My friend Lynly, who is also a real estate agent, shared an article she read about this crazy market. It explained how during the recession a lot workers in the construction industry, in all areas; framing, dry wall, tile install, etc. had to go out and find new careers. Now things are hot again and they are hard to find. The ones that are still in the industry can charge premium rates. Supply & Demand.
Which leads me to the bad news...our house was on hold for a total of a week and a half because the framer had so many jobs going at once, but didn't have enough crews to work them. Great for him, not so great for us. Each week that it is pushed back, creeps us slowing into the holiday season for our move in date.
Even with that delay, those boys are working their booties off to make up time. Here is the progress in the past couple of weeks.
Backyard view
Kitchen
Family Room
Stairway (to Heaven as of now)
Front Entry
Views from the second floor
While we were there this weekend we noticed some changes that we would like to make on a couple of the window heights.
This is the window that will be above the kitchen sink. We would like to lower the bottom ledge. It would be nice for my 5'4" self to be able to see out into the backyard while I do dishes.
This is one out of a pair of windows in the office/den. I think this ledge should be raised for both our privacy and the people next door.
The street view.
Monday, June 24, 2013
Make Along Monday Challenge
My dear friend Shelly, from Dolen Diaries, teamed up with several other amazing bloggers to do a fun monthly challenge called Make Along Mondays. The first Monday of the month they announce a creative challenge. The last Monday of the month you post a picture of what you made. You don't need to be a blogger to participate. You can just snap a pic and post it on her Facebook page. It is just a fun way to give you a reason to create! So pop over to her blog and check it out.
This month the challenge was to make a summer style wreath. In addition to that, I challenged myself to... 1.) actually complete this project and 2.) only use supplies I had at home. This forced me to think on the fly. I had seen a lot of really cute wreaths made from rope so I took that as a jumping off point.
As I started wrapping the foam wreath with rope, I noticed it was beginning to gap. I don't know if I was pulling it too tight, but the look it was making was driving me nuts. So I scratched that idea.
Now I had a problem. I had been hot gluing the rope down as I went, so I couldn't get it off the foam. My only option was to cover it with something. I found some scraps of burlap in my stash of fabric. (Yes, I do have a craft supply hoarding problem, don't judge.) I took the scraps, folded in the frayed edges and wrapped it, erasing my ugly mistake.
I wanted to embellish it with shells to give it a summer feel, so I dug through everything looking for shells to glue on. Being from Florida, I made a vow a long time ago that I would never BUY a shell. I have so many shells that came straight from the beautiful beaches of the Gulf Coast of Florida. But all of those shells are packed and in storage. So I was back to the drawing board again.
What screams summer? Think.....Outdoor festivals, fun in the sun, childhood....I came up with making a mini bunting to string across the wreath. I simply cut small triangles, punched a hole on each top corner and strung it on a piece of twine. I handwrote the letters, but you could use stamps if you have them. Next, I jazzed it up with some festive ribbon.
Pinwheels always remind me of being a kid. So I broke out my amazing, life changing Silhouette Cameo machine and cut some pinwheels using fun paper. If you don't have a Silhouette machine, here is a link to a video on YouTube by One Minute Crafts showing how to make one yourself. I tied the mini bunting on with twine and just pinned in the pinwheels, that way I can change it up with the season. And Ta-Da!
In the end, it was so much fun! It was the therapy I needed at the end of the day.
Subscribe to:
Posts (Atom)


